

Hi friends! I think devoted is a great way to describe love for family...friends... fabrics...quilting...and half-square triangles (haha)!
We are starting the 2nd quarter (like a football game?!) of the Nothing but Love Quilt Along with Block #5 - Devotion. This block is all traditional piecing and can be minimal and use 3 fabrics or be super scrappy. I used 5 in the red example above - 2 prints and 2 cream - and I just LOVE the way it sparkles!
The Block Pattern

Hi my name is Tara and I'm a half-square triangle addict. I do REALLY love them and use them often. As you can see in the diagram, this block is all HSTs except for the bottom corners, and I chose the 4 at-a-time method this time because it is my favorite.
Half-square triangles can be used to make so many cool patterns - diamonds, stars, hearts, zigzags, pinwheels, and more - easily the most versatile patch and I'm a super-fan!


In my Spring version of Nothing but Love (shown below), I tried to have a colored background as well. I don't love it as much as usual because I feel like the heart is not as noticeable, but it is still pretty so I'm keeping it. I mention this so you can evaluate your fabrics and make a more informed decision for your block.

On to the good stuff, here is the downloadable pattern for Block 5 -Devotion:
If you have any questions or issues with downloading please ask here or on the contact page.
Making the Devotion Block - Tips and Tutorial
Lots of tips since I make LOTS of HSTs!
Halfsie - Fabric Efficient Quilting
First I want to provide a picture of the "halfsie" Half-square Triangle that I mention in the pattern right under the cutting instructions. If you don't want to do this little trick then you will need to cut one more background square, but I like this trick so there are not a ton of extra HSTs floating around.

As described in the pattern, I cut one square from the 2 fabrics that are making up the edge of the heart in half diagonally. Place one half of each right sides together with the background fabric (pictured above). And then continue with the sewing around the perimeter to make the 4 HSTs. This way I have two of each combination and I only need one for this pattern.
Squaring Up
Making all of the HSTs is the quick and fun part, but what kills people is the pressing and trimming. Luckily there are not too many HSTs in this block! So press all of the seams open and get those nice flat HSTs and then trim them (or "square them up") using your ruler and rotary cutter. All rulers should have a diagonal (45 degree) line on them for this purpose, but it is definitely easier to use a small square ruler instead of a long rectangular one. This step is very important so that your seams line up and you get decent points and straight lines. The process is:
Line up the diagonal ruler line on your diagonal seam line,
Make sure your 2.5" edge lines are within the block,
Trim off the top and right edges (or reverse if you're leftie),
Flip the block and line up the edge of the block on the 2.5" lines,
Trim off the other 2 edges.
Here is a quickie video showing the process:
Stitching
After all the trimming, lay them out like so and then you stitch them like a four patch. Except for the top center section and 2 bottom corner sections, your four patch should look like a "Broken Dish" block not a "Pinwheel" block which means the center has 2 lights and 2 darks making a diamond.

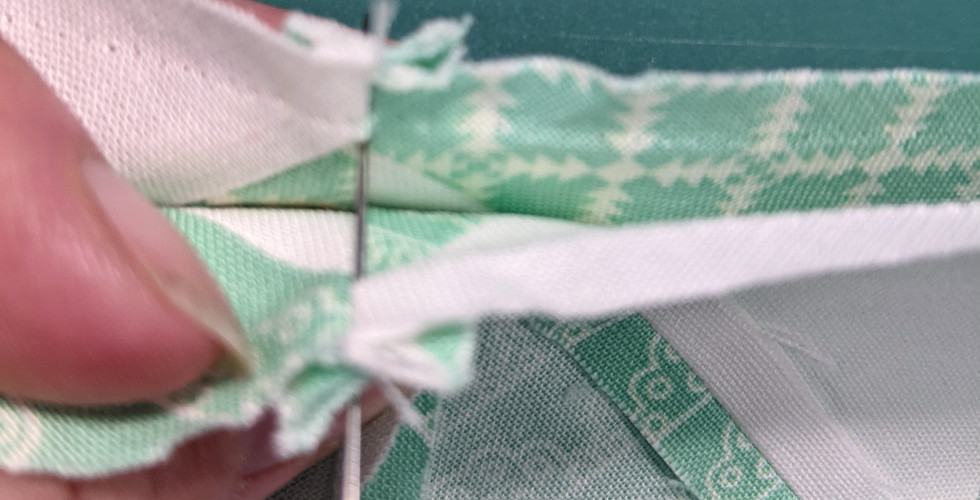
Next stitch your blocks together in pairs. My BIG tip is to not sew the diagonal seam first. Either flip the block upside down to sew the plain corner (like picture one below) or flip and sew together with the diagonal seam on top (picture 2) so it doesn't get caught up in your feed dogs. The important thing is to make sure you sew the correct edge - put a pin to help you remember if needed.


Then it's time to sew your "twosies" into "foursies", so you need to match up your seams and try to keep your points.
In making the four patches, you can see that you are mostly matching straight seams to complete the diamond center. With seams pressed open you can use your fingers or pin to keep your seams lined up.


But when it comes time to make the rows and finish the block you have seams where all 4 diagonal seams come together. To make this pretty point here are some tips (with slideshow photos following):

The area at the tip of your triangles should be 1/4". This will be the seam allowance, so if any are different take that into account when you sew.
Stick a pin from the wrong side into your point (where all seams meet).
Then line up your opposing block seam and other point, and stick the pin directly into it from the right side.
Move them around (if needed) until the pin is totally straight vertically, then secure your pin
When you sew, stitch just slightly to the right (toward the seam allowance) of where the pin goes in (where the points meet). Also take the pin out before stitching, so you don't break your needle.


Press your seams open when you finish. Press from the top as well, some little slips can be fixed with pressing. If you slightly flatten a few points or wobble the seam line just a bit, it should be ok when you look at it in its entirety. If any seam is too mismatched, then make friends with your seam ripper and try again.
I hope you enjoyed this peek into my devotion to Half-square Triangles, and your heart block is nice and sparkly!
Don't forget that it is so much more fun when you share your progress on the blog, Instagram, or Facebook. Don't forget to use the hashtags #nothingbutloveQAL #devotionblock or tag me @polkadotpeepquiltsetc
There are link buttons to my Instagram and Facebook on my website.
You can also sign up and join my community here on Wix (or the Wix Spaces app).
Next week is a quilting post, and I will be tackling the PUMPKIN SEEDS (or continuous curve) quilting motif.
Here is the quilt along schedule (with links for you to catch up anytime):
Nothing but Love Schedule
December 20, 2021 - Quilt Along Intro & Details
January 10, 2022 – Get Ready: Prep the Fabrics & Batting
January 17 – Affection
January 31 – Refuge
February 14 – Joyful
February 28 – Adoration
March 14 – Devotion
March 28 – Inspiration
April 11 – Besotted
April 25 – Admiration
May 9 – Infatuation
May 23 – Faithful
June 6 – Smitten
June 20 – Cherish
July 4 – Patience
July 18 – Comfort
August 1 – Grateful
August 15 –Hopeful
August 29 – Enamored
September 12 - Sashing It All Together & Finishing Details
**Each “between block” Monday there will be a post for quilting the blocks:
January 24, February 7 & 21, March 7 & 21, April 4 & 18, May 2 & 16 & 30, June 13 & 27, July 11 & 25, August 8 & 22, September 5
Have fun making your blocks - I can't wait to see!
Be blessed my friends,
Tara
コメント