
Today we are adding fun things to the edges of our quilt projects: pom-poms, ricrac, lace, ribbon, piping, and prairie points to name a few. This can be done with binding or pillowcase edge methods depending on the final look you desire.

If you want to add some pizazz to your quilted projects, today's tutorial is for you!
I previously reviewed the difference, purposes, and methods for binding and doing a pillowcase edge to finish your quilts. If you missed it, here are the links:
Binding a Quilt
Finishing with a Pillowcase Edge
Today I am going to show you how you can add trimmings to add further texture, color, and visual interest to your projects in a way that is totally achievable for a quilter at any level.
Pom-Poms, Ricrac, Lace, Ribbon, etc.
In case you are unfamiliar with all the possible embellishments here are a few that I have used (shown below).
1- Pom-poms
2 - Ricrac
3 - Ricrac comes in MANY sizes
4 - Ribbon (which also comes in different styles - satin, grosgrain, tulle, etc.)


There is also lace, crochet, pre-made piping, cords and other ephemera. You mainly want to choose something that is "finished" along the sides so it doesn't unravel or fray. And also be careful that whatever you choose has a flat area where it can be sewn into your project.
Piping and Prairie Points
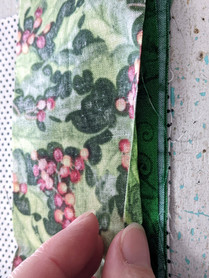
There are also some options that you can make with your chosen fabrics so it all coordinates nicely. In the photo below, you see a pillow with a traditional piping edge, ribbon used as a faux piping, and prairie points as a binding treatment (the little triangles along the edge). I will not be detailing the process of making piping with cord and fabric in this post, but faux piping is a lovely touch.


If you've never made prairie points, here is a quick video:
You simply fold a fabric square in half diagonally twice. You can sew around the perimeter to secure if you'd like (after sewing to the project if you want to be able to tuck the ends in).
Kicking Up your Binding
There are two ways to add these interesting textural items into your quilt projects, the first is as part of your traditional binding.

In these placemats you can see that I added prairie points in during step one of the binding process.
Whatever trimmings you decide to add in will be added during that first step.
Here is a breakdown of the steps:
Place your quilt top with right-side up,
Lay your trimming down also right side up (remember that there is 1/4" seam for the binding that will cover one edge of your trim so place it with that in mind),
Then place your binding (fabric strip folded in half) on top of the trim,
All the raw edges should be along the same side,
Then sew 1/4" from the edge to capture all fabrics and trims.
Then press and complete the binding process as usual.


Isn't that a pretty little detail!
Whatever ephemera you chose will be snug against the quilt top and "pointing" inward toward the quilt center as you can see in the placemats above.
Binding with Ribbon

You can also use ribbon as the binding itself. Many shops carry "blanket binding" which is a 4" satin ribbon already pressed in half to be used as a single-fold binding.
Basically it is applied by sandwiching your squared and trimmed quilt edges between the folds of the ribbon. Corners are mitered by tucking the excess ribbon inside the fold at each corner or you can round the corners and manually tuck the edges as you sew around your quilt one time to secure everything.
Embellishing your Pillowcase Edge
If you want your embellishments to be the outer edge of your item than you need to use the pillowcase edge technique.

The steps for this method are similar to the first method except for a few minor details:
Place your quilt top with right-side up,
Lay your trimming down but there is NO right side as both sides will be seen, and points pointing toward center (There is still 1/4" seam so place the trim accordingly),
Then place your BACKING fabric wrong side up,
All the raw edges are along the same side,
Then sew 1/4" from the edge to capture all fabrics and trims BUT leave a 4-5" hole for turning everything inside out.
Then press, turn the inside out, and sew up the hole.


And there you have it friends - how to add some sparkle and fun things to your quilt projects!
I love to see your work! Share your projects with me by tagging me @polkadotpeepquiltsetc on Instagram or Facebook. Follow me on either platform for more quilty fun or sometimes cooking, family adventures, or other tidbits.
If you have questions, you can ask me in the comments or almost live by using the "Let's Chat" button.
Happy New Year & Be blessed my friends,
Tara
Comments